When We Discovered Our Playstation Hard Drive Was Too Small
Recently, I realized that the hard drive in our Playstation 3 needed replacing–because the old one was just too small.
Our PS3 is one of the original models–and had just a 80 gig hard drive. And an 80-gig drive doesn’t go far when you start downloading games and videos.
At first, the hard drive size wasn’t much of a problem because all we were using it for was game-saves–which take very little room–and game demos. But as time went on, we were starting to have to pick and choose which demos we could download because our hard drive was starting to fill up. And eventually, we even had to start deleting demos. But when the 80-gig hard drive became a major problem after the Playstation Network was hacked–and we took the Playstation Network up on their offer of a month of free Playstation Plus.
Playstation Plus members get lots of freebies–free themes for your PS3, free games for your PS3 and PSP (Playstation Portable), free mini-games, and full game trials for your PS3. This is AWESOME STUFF, and we were really excited–except that our old hard drive didn’t leave much room at all for us to download much.
Replacing Your Playstation 3 Hard Drive
1. Order a Replacement Drive
Selecting a Size for the PS3 Hard Drive Replacement
Fortunately, the price of hard drives has been coming down pretty steadily in recent years. These babies are way more affordable than they used to be!
Any 2.5″ SATA notebook computer hard drive should work in the Playstation 3. Notebook hard drives come in two different speeds: 5400 and 7200 rpm. Drives with less hard drive space may come in either speed–but once you get into drives with more space on them, they tend to only come in the 7200 rpm speed. And 7200 rpm drives tend to create more heat during normal operation–something you definitely want to avoid when it comes to choosing a replacement hard drive–especially considering Playstation is known for having problems with creating too much heat.
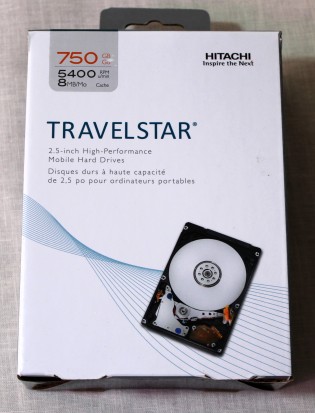
So what does all this mean? You’re probably better off sticking with a hard drive that runs at 5400 rpm to minimize the heat it will create during operation. In my research, the largest capacity 2.5″ notebook hard drive that runs at 5400 rpm is 750 gigs: check out the 750 Gig Hitachi Notebook Hard Drive I ordered from Amazon.com. Although this particular listing for the Hitachi drive is brand new and doesn’t have any customer reviews yet, many of Hitachi’s other 2.5″ notebook hard drives on Amazon have received exceptional customer reviews–so I can see that Hitachi is one of the best-performing brands.
You can also check out other 2.5-inch Notebook Hard Drives on Amazon.com.
2. Order an External Hard Drive
This drive should:
- be large enough to hold all the data on your old PS3 hard drive
- have a USB 2 connector so that you can connect it to your PS3
- be of FAT32 format. (Since many drives come pre-formatted for Windows, which means they’ll be formatted top NTSE, you can run a utility on your computer to change their formatting to FAT32.) HELPFUL HINT: both Windows and Mac computers will generally have formatting utilities–but the Mac’s utility seems a lot easier to use.
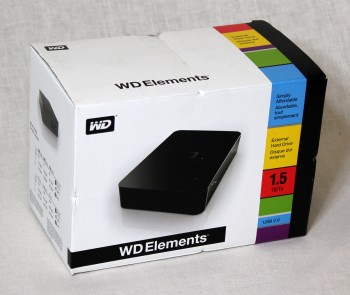
To hold the data left on my PS3 drive, I only NEEDED an external hard drive with 38 gigs of space. But the Western Digital 1.5 TB Drive I found was such a great value that I couldn’t resist. One and a half TB! That’s 1,500 gigs! A nice-sized drive, with excellent customer reviews, will give me room to back up all my photos and videos. ( You can order the Western Digital WD Elements 1.5 TB External Hard Drive from Amazon directly and get free Super-Saver shipping.)
3. Get the Right Screwdrivers
If you don’t already have them, order a size 00 precision Philips head screwdriver. This is the exact size you’ll need to remove the old hard drive from your Playstation 3. You’ll also need a very small flat head screwdriver to remove the door to your PS3’s hard drive. (Using the wrong-sized screwdriver can quickly cause screws to strip–definitely NOT something you want to have happen.)
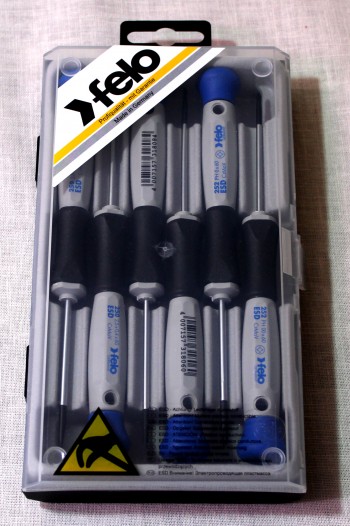
Based on customer reviews and ratings I found during my research, I ended up buying a set of Felo Screwdrivers from
Amazon. The price was reasonable, and the set came with the Philips head size I needed, plus a conveniently tiny flat head screwdriver that worked perfectly for removing the hard drive cover plate on the Playstation. Another great selling point: according to Felo, these screwdrivers help to dissipate static electricity, which is the enemy of electronics and media-storage devices. Plus, Felo screwdrivers have a lifetime warranty.
A word of warning: although well-made, these screw drivers can become damaged if your screws are tight enough to become stripped, or if the screws are already damaged from having been previously overtightened. So use them carefully! (Fortunately, the lifetime warranty takes some of the worry out of this difficulty.)
Order a Felo Screwdriver Set from Amazon
4. Back Up the Data from your PS3 to the External Hard Drive
To do this, you’ll plug your external hard drive into your Playstation with a USB 2 cable. Then, go through the Playstation menu and activate the backup utility: you’ll find this utility in your Playstation menu under the System Settings submenu. Note: your Playstation will only recognize an external hard drive that’s been formatted to FAT32: NTSC formatted drives won’t show up at all. THIS STEP WILL TAKE A WHILE: for us, backing up 38 gigs of data took about 2 hours.
Helpful Hint: When to Delete Data, When to Save
Any games, plugins, and themes that you’ve previously downloaded from the Playstation Store can be re-downloaded once you upgrade your Playstation’s hard drive–so you may want to delete these items from your old hard drive rather than backing them up to the external drive and transferring back onto the new drive. Moving large amounts of data back and forth between drive will take a substantial amount of time–much more than simply re-downloading it once you’ve got the new drive in.
5. Remove the Old Hard Drive from Your Playstation 3
SAFETY ALERT: To avoid ELECTRICAL SHOCK, ALWAYS MAKE SURE YOUR PLAYSTATION IS UNPLUGGED before messing with the internal parts. This means unplug your Playstation from the wall AND unplug it from your TV / monitor.
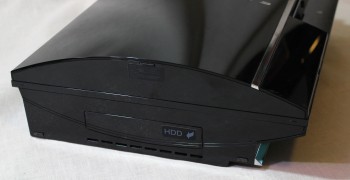
- Using the flat head screwdriver, GENTLY pry off the door to the Playstation 3’s hard drive. It’s labeled with “HDD” on the outside, and is located on one of the end pieces of the unit.
- Grasping the little metal wire handle attached to the hard drive, shift it to the right. You’ll feel it “click” into its new position.
- Gently, pull the wire handle strait toward you. The hard drive should slide out easily–hold it by the edges to remove it the rest of the way. NOTE: pay close attention to the proper sled position, because you’ll need to make sure it’s in the same position when you replace it.
- Using your Philips head screwdriver, remove the four screws that hold the hard drive to the sled. (The sled is the bracket that holds the hard drive in place.) BE CAREFUL not to strip the screws. (This is the place where I had trouble, the first time around–I’ll post my solution to the problem in a later post.)
- Remove the old hard drive from the sled.
6. Replace Old PS3 Hard Drive With New One
- Gently place new 2.5″ notebook hard drive in the sled.
- Attach the new hard drive to the sled with the screws removed from the old drive. (You may also elect to replace these screws with brand new ones of the exact same size.)
- Carefully replace sled into the Playstation 3, making sure it goes in the same way it came out. NEVER FORCE IT! If it doesn’t slide back in without resistance, something is probably not aligned exactly right.
- Grasping the little metal handle, slide hard drive back to the left. You’ll here it click into position.
- Carefully replace cover plate over hard drive.
7. Restore Data to the New Playstation Hard Drive
After hooking your Playstation back up to power and the TV, plug the external hard drive back up to the Playstation. Using the backup utility on your Playstation menu, restore the data you saved on the external drive back to your (new) Playstation Drive. This will take about as long as it took to back the data up.
8. Enjoy Your New Hard Drive!
We replaced our hard drive about a week ago, with no difficulties since. The new Hitachi drive is actually quite a bit quieter than the one that was already in the Playstation. It also seems to run quite a bit cooler than the original drive, probably because it’s a newer line of product designed to use less energy–an added bonus!