From the Kitchen of Nindo Mom
This recipe takes a while to make — mostly, because of the time it takes to coat each piece of chicken.
As an alternative to the “nuggets,” I’ve made this recipe with larger pieces–like maybe breasts cut in half, so they’re about 3″ x 3″. This is perfectly acceptable–however, it does change the taste quite a bit. With larger pieces of chicken, you get a lot less of the flavoring from the tasty coating and a lot more just plain chicken taste. My son (10) has told me in no uncertain terms that he prefers the smaller pieces. With this in mind, this is a recipe that’s best made on weekends. Leftovers are welcome, so I’ve devised this recipe into a fairly large batch.
I start with the best ingredients I can find, in terms of quality and taste. Because that’s a big part of why I devise recipes and cook at home–because I want my family’s food to be healthier and to taste better than what’s available in the typical restaurant.
You will notice that, unlike most homemade chicken recipes you’ll see, I don’t add salt. That’s because the “secret ingredient” already contains salt, and I don’t need my food to taste super-salty. Especially not when we’re dipping the nuggets in sauce, anyway.
If you love this recipe, try these next time!
Chicken Recipe: Spicy Chicken Nuggets
Spicy Chicken Nuggets – with Secret Ingredient!
- Electric frying pan
- Deep non-stick pan with lid
- Deep fryer
- blender
- Bowls
- Plates
- Parchment paper
- 3 pounds boneless chicken breast (cut into nugget-sized cubes, (the best I can find in my area is Nature’s Promise brand by Giant food. Their Nature’s Promise chicken breast tastes the best to me, and doesn’t have the weird aftertaste some of the other brands can have.))
- 2 cups flour
- 10 cups crisp rice cereal ((secret ingredient!))
- 1 cup milk ((I prefer Horizon organic milk because there’s no hormones–and because it tastes better, at least to me!))
- 3 extra-large eggs ((I recommend Eggland’s best for a boost in nutrition))
- 1/2 cup spring water
- 1 tbsp honey (I get mine from the local farmer’s market.)
- 2 tbsp paprika
- 1 tbsp red pepper flakes
- 1 tbsp garlic powder
- 1 tbsp black ground pepper
- 1 quart peanut oiI (I like peanut oil because of the taste it adds. You could certainly substitute another type frying oil, if you prefer, for health reasons.)
Prep Work
In bowl #1:
- Whip together eggs and spring water until foamy.
- Set aside.
In (larger) bowl, #2:
- Add honey and microwave, 5-10 seconds at a time, until honey flows freely, (This usually takes from 10 to 25 seconds–be careful not to overheat, or honey may start to harden.)
- Remove bowl from microwave and add milk–a little at a time–and stir together after each addition until well combined.
- Place chicken cubes in bowl and toss to coat well. Cover and refrigerate until needed.
On Plate #1:
- Gently toss together flour and paprika.
- Set aside.
On Plate # 2:
- Line with 1 sheet of parchment paper.
- Set aside.
Blender:
- Fill to maximum fill line (mine is at 7 cups).
- Put lid on blender and turn on low speed for about a minute.
- Add remaining rice cereal, red pepper flakes, ground pepper, and garlic powder; replace blender lid and blend for about 1-1.5 minutes until crispy rice has turned into powder and the entire mixture is well blended.
- Pour as much of mixture as will fit onto plate #3; set aside, (Any amount that won’t fit, you’ll add on later when some of the mixture has been used up on the chicken.)
Let's (Really) get started!
Pre-heat your oil. If using an electric frying pan, set the temp to 350 degrees. If using a fry pan, set to medium to medium-high temperature and use a frying thermometer to ensure proper cooking temperature.(An electric frying pan is ideal for this recipe because it automatically keeps the oil at the right temperature. A deep fryer is another excellent choice*–and it's actually designed specifically for this method of cooking. If using a fry pan, you will have to monitor – and possibly adjust – temperature each time you add new (cold) chicken.) *A dedicated deep fryer will use a lot more oil than I've noted in this recipe. And, deep fryers are not multi-purpose. But if you have room in your kitchen for a dedicated fryer, it certainly can be a nice convenience.
Place a handful of chicken cubes on the flour mixture plate; toss well to coat.
One piece at a time, dip coated chicken into egg mixture, then transfer to crisped rice mixture and toss to coat well. Transfer to parchment paper lined plate, arranging chicken so it doesn't touch any other pieces. (Otherwise, pieces may stick together.)When necessary, start another later of chicken on top of the first, placing a piece of parchment paper between each layer to prevent sticking.
Repeat steps 2-3 until all chicken is coated.
A handful at a time, fry chicken nuggets. They'll need to cook for about 2 minutes per side (or 4 minutes total) and should be cooked all the way through on the inside and golden brown on the outside. Drain on paper towels.
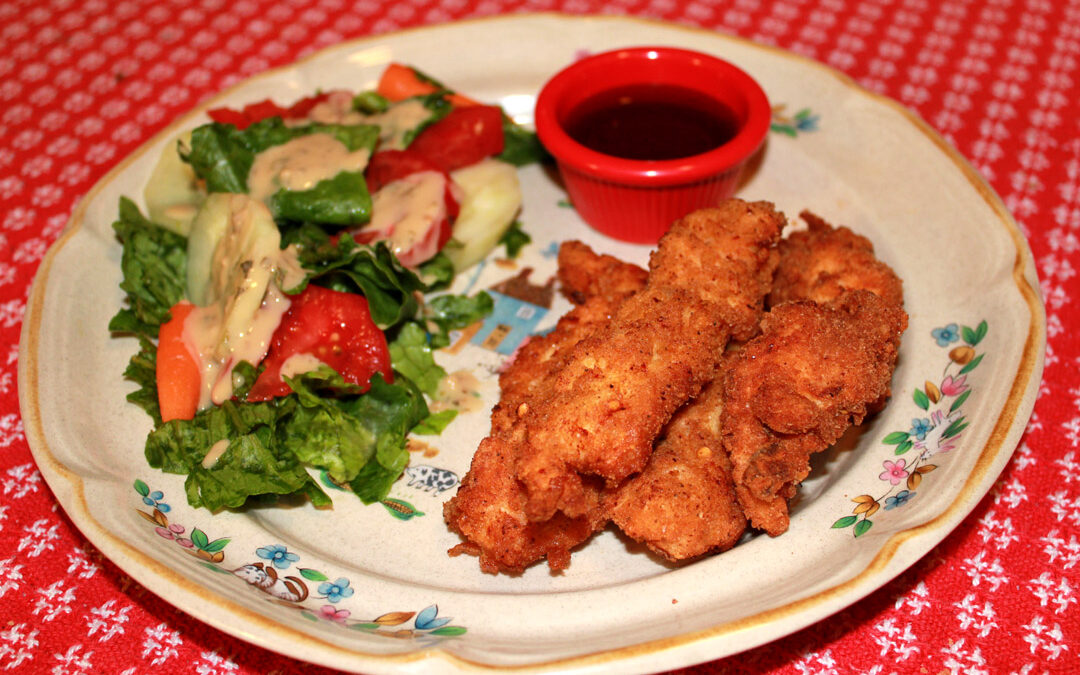
Serve with dipping sauces such as honey, barbecue sauce, honey-mustard, ranch dressing, or orange marmalade loosened up with a touch of pineapple juice.
Enjoy!
Special Notes:
I like to serve this recipe with a fresh salad to help counteract the oil on my palate (and in my stomach). These chicken nuggets also go well with fresh steamed rice.
To keep earlier batches of nuggets warm, consider placing in a 250 degree oven after they’ve drained until dinner is ready. (If you try this, be careful not to over-dry them.)
To reduce dipping and overall cooking time, you can try cutting the chicken breasts into thin strips instead of cubes. You may need to add 30 seconds cooking time to each side. Just be sure the strips are cut thinly to allow a yummy amount of coating-to-chicken ratio!
Pros for this Recipe:
- Delicious and especially well-liked by kids.
- Kids can get involved by helping add and mix together dry ingredients.
- Much less expensive to make at home than buying at Chik-fil-a (a favorite of ours).
- Healthier than pre-prepared, store-bought nuggets — higher in protein; no preservatives; made from “real” (non-chemical) ingredients; lower in sodium
- Delicious leftovers for a couple of days
- Cooking at home sets good example for your kids of healthier eating habits
Cons for this Recipe:
- Time-consuming to prepare
- Dirties up a lot of dishes
Kid’s Review of this Recipe
Unedited, except for spelling and (a little) grammar and spelling. Reviewer is a ten-year-old boy.
Hi, today I will be giving you a review of the Spicy Chicken Nuggets. The thing I first realized about the chicken nuggets was that they had a nice texture, which is what I prefer most. Not the kind that’s too soft–for example, some chicken nuggets are so soft, they literally slip out of your hand every time you try putting them in your mouth. And they’re not too hard, like when some restaurants leave them in the oven too long. Then, the moment you take your first bite your teeth feel like they want to just pop out of your mouth.
This chicken is just right! It has a nice crunch in your mouth. In my opinion, it is the best chicken I’ve ever had in my life. Let me give you some advice on this: do try to make this recipe. ‘Cause I thought it was going to be okay, but when my mom served it, it wasn’t just OK–it was excellent! So whatever you expect, it is probably 99% better.
This is my first NindoMom kid review. Thanks for reading–and I’m looking forward to “seeing” you next time. 🙂